
If you still have a door with a mortise lock in it, you’re stuck with an older and more complicated locking system. They might be reliable and sturdy, but they can be right old pains to fix, repair or replace – which is probably why many home owners these days are choosing to ditch the mortise lock and switch to a more straightforward cylindrical lock.
In this guide, you’ll get the lowdown on just how to swap out a mortise lock for a cylindrical one. It’s not exactly rocket science, and with the right tools and a bit of patience, you’ll be done in no time.
What’s the Difference Between a Mortise Lock and a Cylindrical Lock Anyway?
Before you get stuck in, it’s worth understanding what you’re actually swapping out.
A mortise lock pretty much lives inside a big deep pocket (called a mortise) that’s cut right into the door. It’s a lot bigger and more fiddly than a cylindrical lock and you’ll often find them in older houses across places like Cardiff and the UK.
A cylindrical lock (which is often called a tubular latch lock) is simplicity itself. It just pops into a small hole you drill in the door and is a doddle to fit and replace.
The thing is, swapping between the two isn’t a simple case of taking the old lock out and shoving the new one in. You’ll end up having to mess around with the door a bit to get it to work with the new lock.
Tools and Materials You’ll Need to Get Started
First job’s to make sure you’ve got all the gear you need. Here’s a list to get you going:
- A good screwdriver (flathead and Phillips)
- A drill – preferably one with a hole saw attachment
- Wood filler or a mortise conversion plate (and a bit of common sense)
- A tape measure
- A pencil
- A chisel (optional, but it can come in handy)
- Some sandpaper
- And of course, your brand new cylindrical lock set
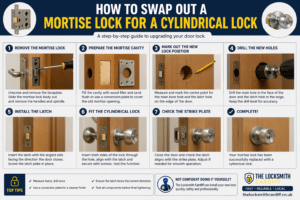
Step 1: Rip the Existing Mortise Lock Out
Get the door open and find the screws on the edge plate.
- Unscrew and take the faceplate off
- Gently tease the mortise lock body out of the door
- Get rid of the handles and spindle
You should now be left with a big gaping hole where the old lock used to be.
Step 2: Take Stock of the Mortise Cavity and Plan Your Next Move
Here’s the tricky part. A cylindrical lock needs a hole that’s round, not rectangular like the old lock.
You’ve got two options to choose from:
Option 1: Fill the Cavity In
- Use some filler to plug the old space
- Sand it down to make it all flush and even
Option 2: Get a Conversion Plate In
- A quicker and neater solution – and probably a better one if you want a really slick finish
- Covers the old cavity and gives you a solid base to start from for the new lock
If you want a top-notch finish, the conversion plate is the way to go.
Step 3: Mark Out the New Lock Position
Most cylindrical locks are pretty standard in terms of how they fit:
- A backset of around 60mm or 70mm (distance from the edge of the door to the centre of the hole) is a good rule of thumb
Get your tape measure and pencil out and mark:
- The centre point for the main borre hole
- The latch hole on the edge of the door
Accuracy is key at this stage. If you mess this up, the rest of the job’s going to be a right pain.
Step 4: Drill the New Holes
Get out the drill with the hole saw attachment and:
- Drill the main hole through the face of the door
- Drill the latch hole into the edge of the door
Take your time – and make sure you keep the drill level – or else you’ll end up with a mess.
Step 5: Fit the Latch
Push the latch into the edge hole:
- Make sure the angled side of the latch is pointing in the right direction (so the door closes properly)
- Screw the latch plate into place
If you need to, have a bit of a fiddle with the recess to make sure it all sits flush.
Step 6: Get the Cylindrical Lock Fitted
Now install the main lock:
- Slide one side of the lock into the hole
- Line it up with the latch mechanism
- Secure it all with some screws
Before you tighten everything up, have a test to make sure the handle and lock all work properly.
Step 7: Check the Alignment with the Strike Plate
Close the door and have a look at how the latch is meeting the frame.
- If it all looks a bit off, you might need to adjust or swap out the strike plate
- What you’re aiming for is a smooth, secure close.
Common Mistakes to Watch Out For
- Misaligned drilling (which tends to result in a lock that sticks)
- Not filling the mortise cavity properly (which can leave you with a loose fit)
- Fitting the latch the wrong way round (which is just a right old nuisance)
- Rushing through the job without double-checking everything (which is just asking for trouble)
Take your time, and make sure you double-check each step.* Emergency and same day callouts – no need to worry about those door dramas in Cardiff
You won’t have to lose sleep over things going wrong – no dodgy fits, busted doors or security issues to deal with.
The great swap – replacing a mortise lock with a cylinder one – isn’t as straightforward as it sounds. Getting it right is all about taking the time to get it right first time & having a steady hand when it comes to drilling.
If you reckon you can handle it, & have all the right tools at your fingertips, you should be alright. But if you’re not entirely confident, it’s usually best to cross your fingers it gets done properly the first time round – you don’t want to end up having to fork out for repairs or going through all the stress on top of it.
If you’d rather just let a pro get on with it, then The Locksmith Cardiff are on hand to sort out your lock woes.
